User Enrolment, Removal and Updates
This article explains how to manage users in Coursebox, including enrolling learners, removing a user, deleting a learner, adding someone to a course, bulk uploading users, and managing roles and access levels. Whether you need to unenrol a learner, add a facilitator, or promote a user to admin, this guide covers it all.
Watch the tutorial videos found in our YouTube Video Library.
Access Levels – Marketplace vs Branded Platform
When building and delivering training through Coursebox, it's important to understand the key differences between using the Marketplace and a Branded Training Platform. While both models offer powerful tools for course creation, learner engagement, and collaboration, they serve different purposes and offer varying levels of control and customisation.
Marketplace
The Marketplace (my.coursebox.ai) operates under the Coursebox theme and is ideal for creators looking to publish and share courses to a broader audience. Managed by the Coursebox super admin, this setup is best for those who want to build their presence within the existing Coursebox ecosystem.
Theme: Coursebox | URL: My.coursebox.ai
User Levels:
Super Admin: Travis
Creator and plus can: create courses/groups (plus only), invite course and group admins to collaborate, enrol a user into a course as facilitator
Learners can: be added as General Users without a profile.
Branded Training Platform
A Branded Training Platform (Business & Enterprise) is a white-labelled version of Coursebox hosted under the client's own URL and branding.
Theme: Client Theme | URL: Client's URL
User Levels:
Super Admin: Client's email
Approved Experts (Admins) can: invite course/group collaborators, enrol a user into a course as facilitator
User Admins can: manage community/users and theme
Learners can: be added as General Users without a profile.
Manage Users and Groups
Navigate the Users Section
From the left-hand navigation menu, click Users. The Users page has four tabs:
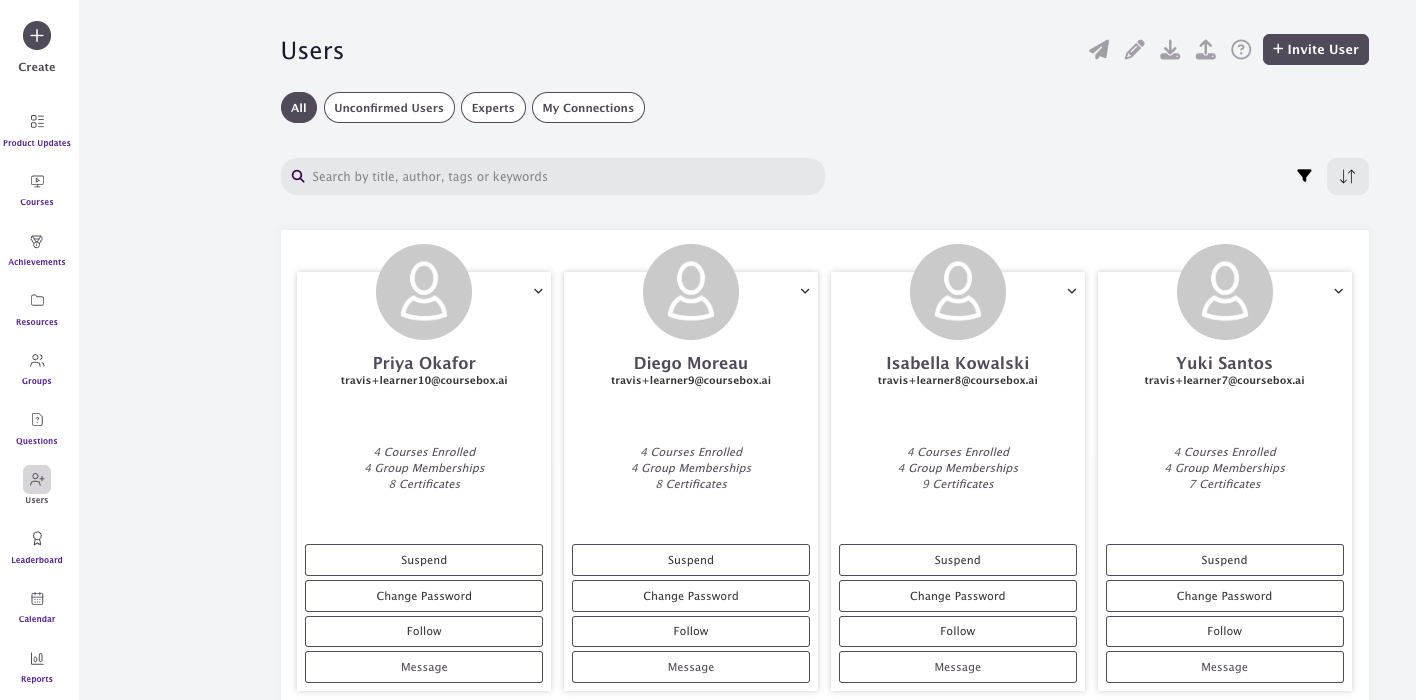
All — shows every registered user on the platform.
- Unconfirmed Users — shows users who have registered but not yet confirmed their email address.
- Experts — shows users who have been granted Approved Expert status.
- My Connections — shows users you follow or are connected with.
Each user card in the All tab shows the following quick actions: Suspend (restrict access), Change Password, Follow/Unfollow, and Message. Click the dropdown arrow (˅) on any card for additional options: View Profile, Unfollow, Change Password, or Update User (edit basic details).
For Business & Enterprise Accounts only. To upgrade: https://www.coursebox.ai/pricing

Plan Requirement
Access to the Users section is only available on our Pro, Business, or Enterprise plan.
To access Users, click Users in the left-hand sidebar menu. If you do not see it, it may not be available on your current plan, or it may have been hidden by your Super Admin.
Creator-level Permissions
As a Creator, you can upload users via CSV or invite users by email from the course-level "About" page by clicking Users.
Unenrolling Learners (Remove Someone from a Course)
As a Course Administrator or Facilitator:
Visit the course about page as the course author or invited admin
Click the people icon
Click the trash can to remove the learner from the course
Manage User Profile
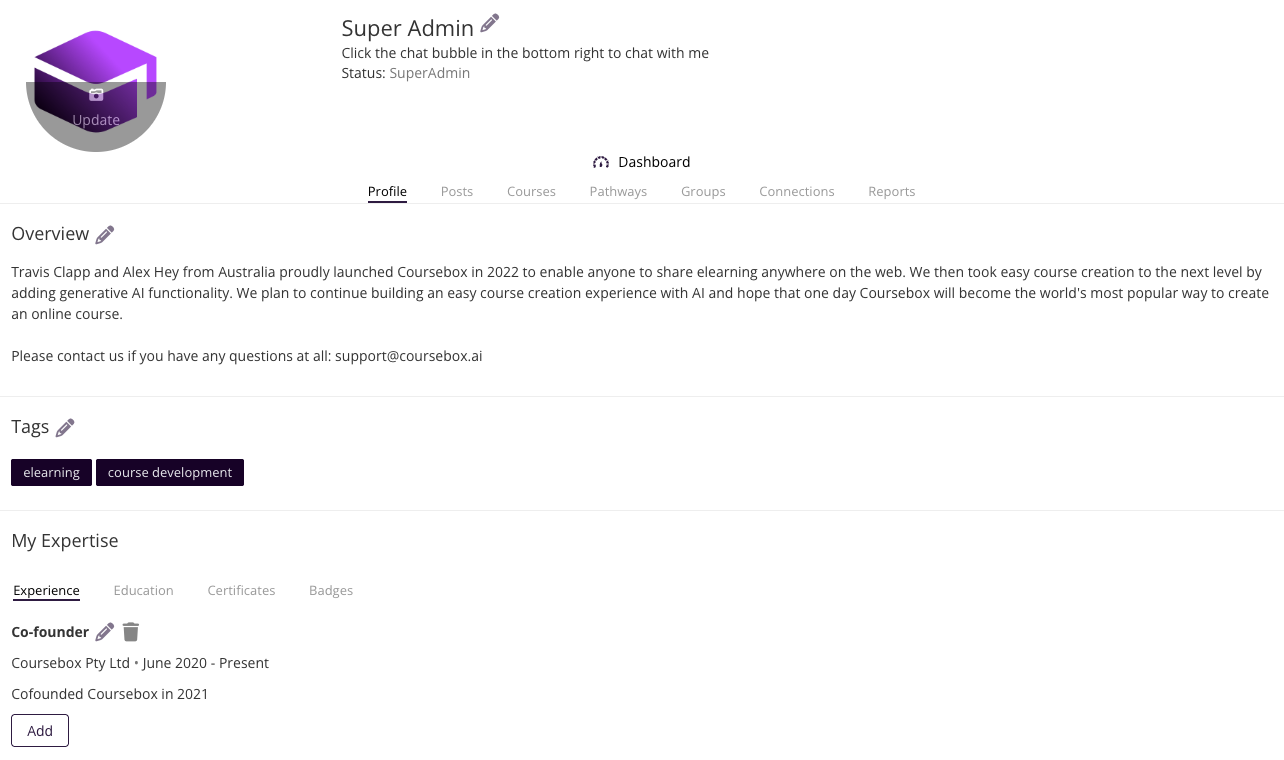
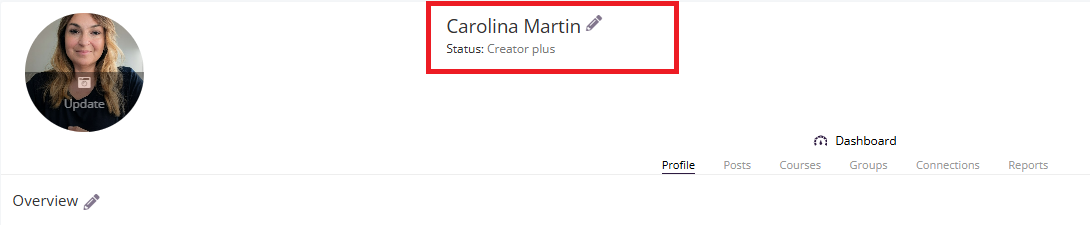
Every member of the Coursebox Branded Training Platform (Premium) has their own profile page which they can edit.
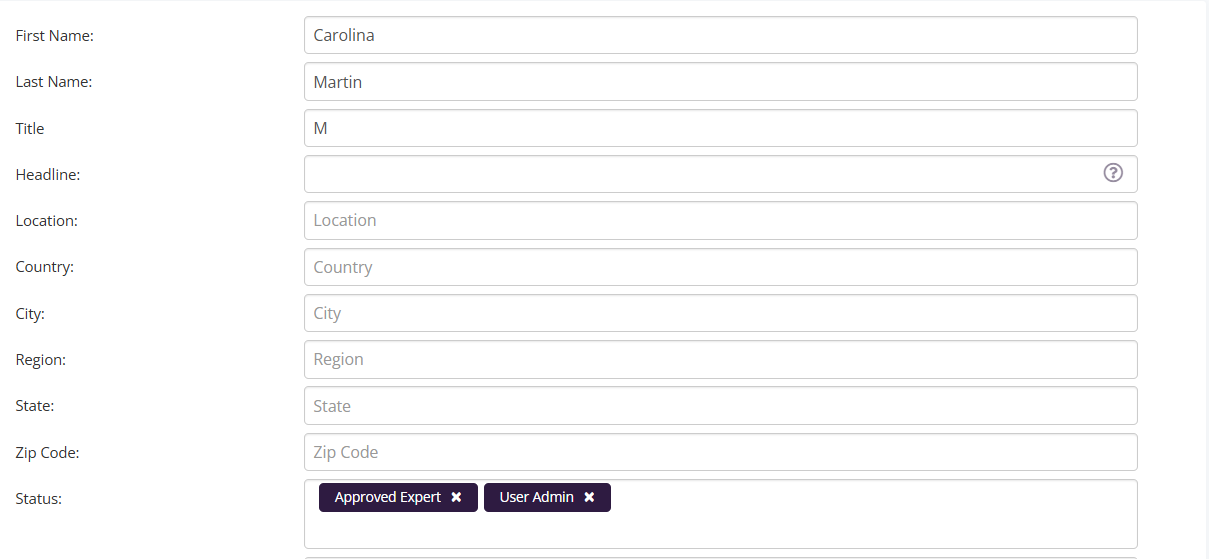
Click on the profile and the following screen opens. Then you can adjust all the sections of your profile by clicking on the pen icons.
Add and Remove Learners Individually (Enrol or Unenrol a User)
Coursebox allows you to add learners one at a time, invite someone to a course, or grant access to a user directly.
FROM THE DASHBOARD: From the Left hand menu, select users:

Then click on the invite a user.

The following will open up and you can invite someone using their first, last name and email.

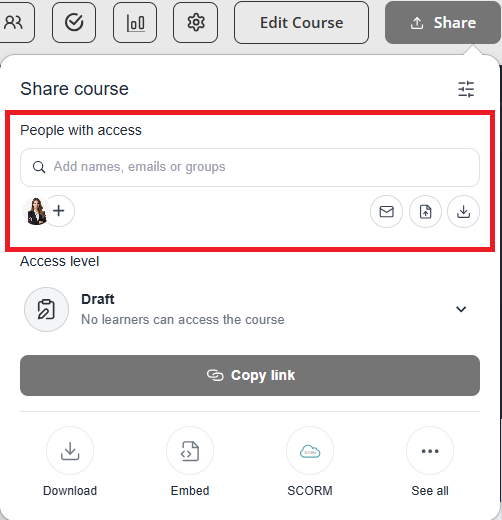
FROM THE COURSE: Select the Share button and add the email of the person you want to invite.
Unenrol a Learner from a Course (Remove a User from a Course)
Course admins can remove learners from a course, revoke access, or unenrol a user whenever needed.
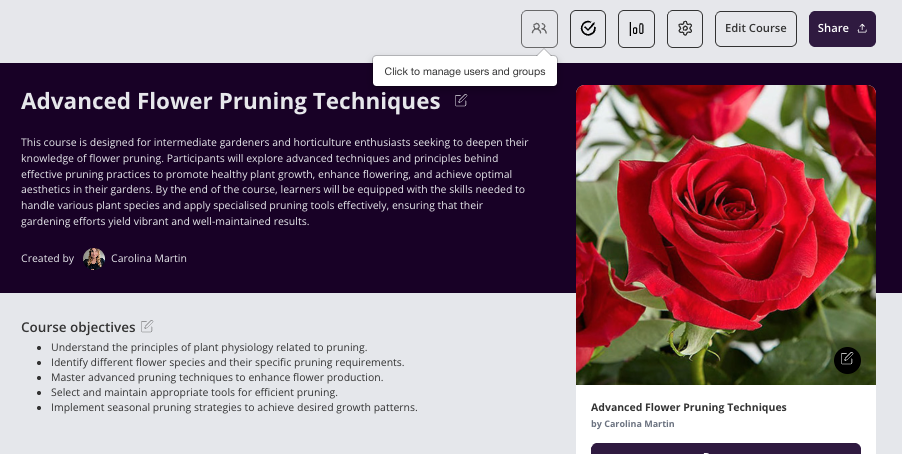
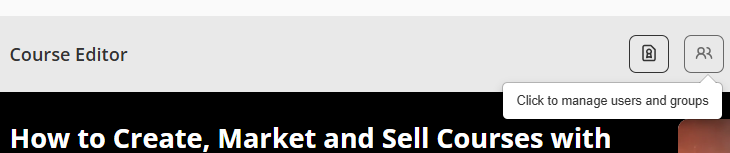
From the Course Editor, click the People icon in the top-right corner.
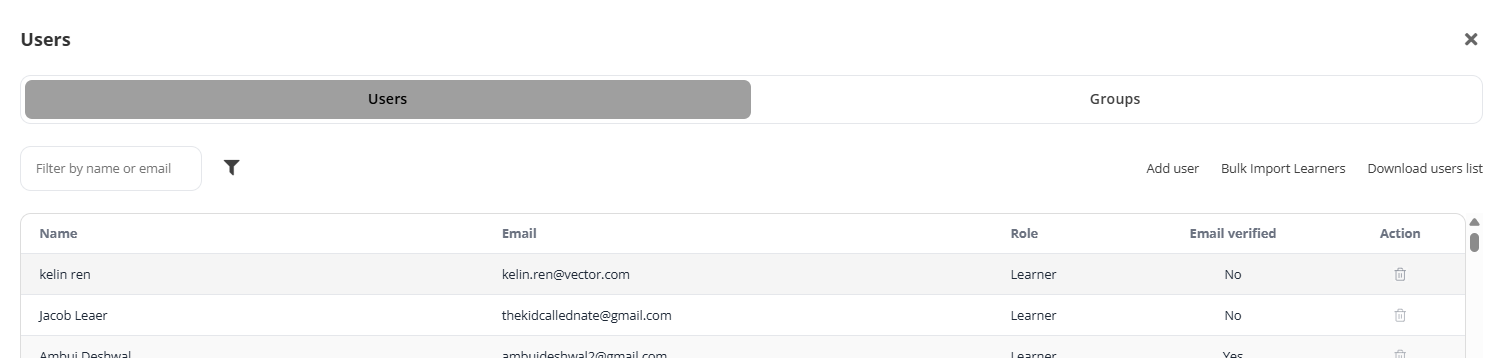
In the Users panel, find the learner and click the trash can icon in the Action column to unenrol them.
If re-enrolled later, progress is not lost — the learner will continue from the same point.
Note: Learners cannot self-unenrol. Super admins must be invited as course admins to assist with enrolments.
Delete (Remove) a Learner from the Platform
Removing a learner from a course (unenrolling) is different from permanently deleting a learner's account from the platform. This section covers how to fully delete a user, remove someone from the platform, or deactivate a learner account.
Unenrolling removes a learner from a specific course but keeps their account active. Deleting a learner removes their account and all associated data from the platform permanently.
How to Delete a Learner
Go to Users from the left-hand menu.
Search for or locate the learner you want to remove.
Click on their profile to open it.
Click the dropdown arrow next to their name.
Select Delete User from the options.
Confirm the deletion when prompted.
Note: Deleting a learner is permanent and cannot be undone. All course progress, certificates, and data will be removed. If you only need to restrict access temporarily, consider unenrolling them from specific courses instead.
⚠️ Looking to close your own account instead? Deleting a learner from the platform is not the same as closing your Coursebox account or cancelling your subscription. If you need to cancel your plan or delete your own account, please refer to the Account Access, Management & Subscription article.
Upload a CSV List of Learners (Bulk Import Users)
When you need to enrol multiple learners at once, bulk add users, or import a list of people, use CSV upload.
First prepare you CSV file
Your CSV file should contain: First Name, Last Name, Email, Headline (the name of the course), Password (optional), Confirm (optional), Send (optional), Accepted Terms (optional).
In the Users section, click the arrow up next to the question mark.


Select the CSV file from your computer and upload.
Return to the Users tab to verify learners were successfully added.
Manage User Status (Change a User's Role)
By default, invited users are set as General Users. Status — also called role or user type — can be changed by the user or by a Super Admin.
Status Change by User
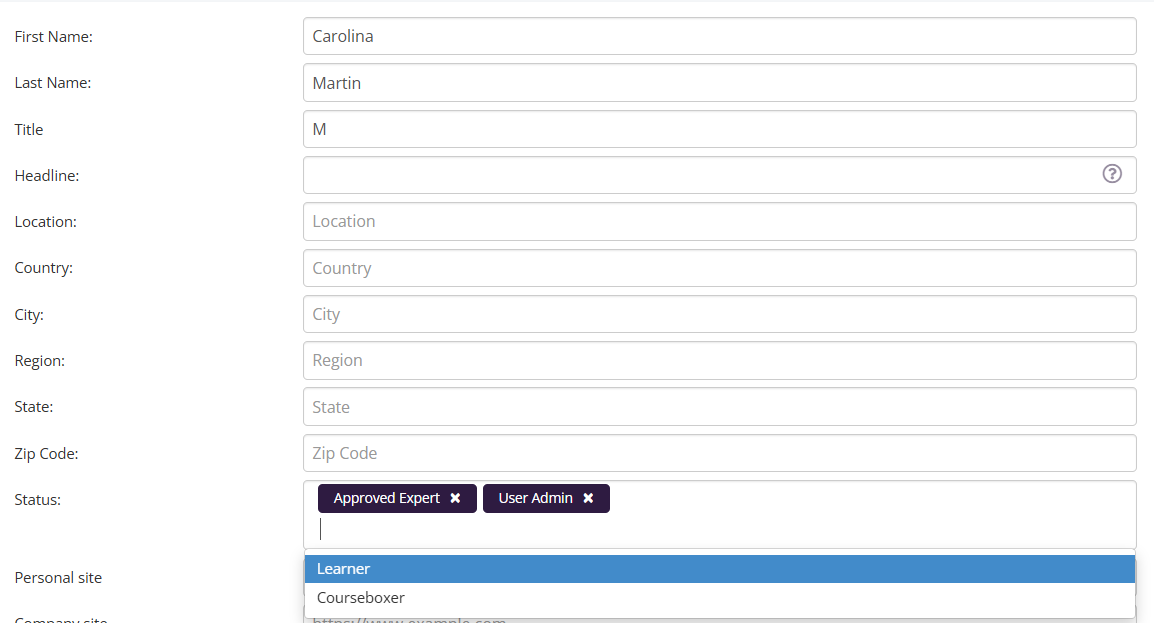
Click Profile > click the pen beside profile name > go to the Status section > choose from the dropdown.
Available statuses/roles (current platform options): Learner, Creator, Creator Plus, Approved
Admin, User Admin. Note: For Approved Expert status, changes trigger a Super Admin approval request. See the Approved Experts section below for details on how to set this directly as an admin.

Status Change by Admin
Go to Users, click on the user's profile, click the pen icon, then delete or add the desired status and click Save.
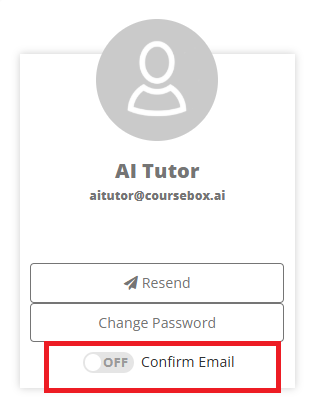
Managing Unconfirmed Users
Unconfirmed users have not yet confirmed their email. In the Users section, click the hourglass icon to view them. Click the send icon to resend invitations in bulk.

TIP: You can override email confirmation by clicking 'confirm email' on the user's profile.
Add Facilitators (Give Someone Access to Help Run a Course)
Adding a facilitator — also called adding a co-trainer, granting course access, or assigning a course helper — gives that person access to support course delivery and assist learners.
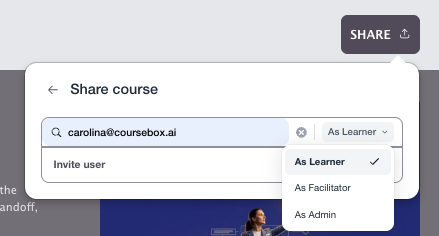
Navigate to the course and click the Share button at the top of the course editor.
In the pop-up, click People with Access
Type the person's email address, set the dropdown to As Facilitator, then click Invite User.
Manage Collaborators (Add a Course Editor / Co-Creator)
Adding a Collaborator — also called adding a course editor, sharing editing access, or inviting a co-creator — gives that person full access to view, edit, and contribute to your course development.
Add a Collaborator
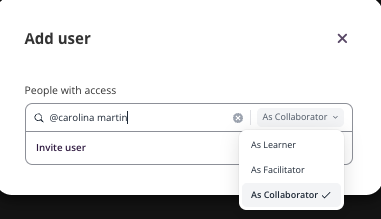
In the Course Editor, click the Manage Users and Groups icon.
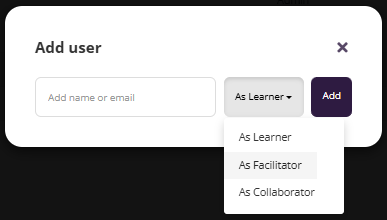
Select Users > click Add User on the right > type '@' and their name > select Collaborator from the dropdown > click Add.
Note: The person must already have a user profile in your platform before they can be added as a collaborator.
Delete a Collaborator (Remove Editing Access)
Open the person's profile > click the Edit icon (pencil) next to their name > click the X next to Collaborator > click Save.
Manage and Update User Names and Types
For Business & Enterprise Accounts only.
From the user's profile card, click the arrow down > select Update User > click the pencil icon to edit > update the Status field > click Save.
Manage User Registrations (Control How People Sign Up)
The Super Admin can control registration methods — also known as how users sign up or login options — including email, social media, and SSO via Settings > Registration.

Approve Experts (Promote a User to Expert Status)
Coursebox allows users to request Approved Expert or User Admin status, while Super Administrators can approve or promote users directly.

Setting Approved Expert Status
Click Profile > click the pen beside profile name > click Status > select Approved Expert.

The Super Admin will receive a notification to approve or reject. Alternatively, the Super Admin may set this directly from the user's profile.
Approved Expert as Influencer
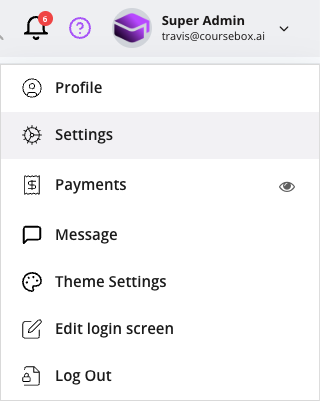
Go to Settings
Navigate to Influencer and toggle on/off Approved Experts as Influencer.

Approved Expert as API User
Go to Settings and toggle on/off Approved Experts as Open API to enable Zapier access.
