
Create and Manage Events in Coursebox
Plan requirement: Groups, the Calendar and Group events are part of the branded LMS, available on Pro + LMS and Enterprise. Zapier is available from Creator and above. Compare plans.
This article explains the different ways to run live sessions, workshops and webinars with Coursebox: how to create an event, who can register, how to collect extra registration details, how to track attendance and how to share a recording afterwards.
There is no single events module. Instead, there are 5 methods you can use on their own or together. Pick the one that matches how people register and how much evidence of attendance you need.
Before you start
Coursebox does not host the live session. Run the session in Zoom, Microsoft Teams or Google Meet, then paste the meeting link into the event's Where field or into a course page.
Events are one-off. There are no recurring events. Create a separate event for each session.
Attendees need a Coursebox account. Group and Calendar events can only include people already registered on your portal. To take registrations from people outside your portal, use Method 3 or Method 4.
Recordings are not imported automatically. Copy the recording link from Zoom or Teams and add it yourself after the session.
Compare the methods
Method | Best for | Who can register | Attendance tracking | Reminders |
|---|---|---|---|---|
1. Event post in a Group | Internal sessions for a known cohort | Existing portal users you add as attendees | Yes. Mark each attendee and download a CSV | Yes |
2. Calendar event | Simple scheduling and invites | Existing portal users | No | Yes |
3. One course per event | Sessions with pre-work, a recording and a completion record | Anyone with the link if the course is Public, or enrolled users and Groups | Self-declared, approved by you. Shows in course reports | No event reminders |
4. Eventbrite or Calendly with Zapier | Public registration pages, paid tickets, custom registration questions | Anyone | In the external tool, or combine with Method 1 or 3 | From the external tool |
5. Zoom or Teams attendance with an admin Group | Many sessions where attendance evidence matters | Depends on the method used for registration | Automatic in Zoom or Teams, stored as posts in a private Group | From Zoom or Teams |
Method 1: Post an event in a Group
A Group is a space for a set of learners. Any post in a Group can include an event with a date, location, hosts, attendees and attendance marking. This is the built-in way to manage attendance.
Create the Group
Select Groups from the left-hand menu and click + Create.
Enter a Title. The Code is optional.
Click Create group. The Group starts as Draft.
Use the access dropdown under the description to change it to Restricted (invited members only) or Public.
Add learners on the Members tab, one at a time or with Bulk Import Members.
You can use 1 Group for a recurring audience (for example "Science teachers") and post each session in it, or create 1 Group per event if every session has a different audience. See Group Management for every Group setting.
Create the event
Open the Group and scroll to the post box under the Members and Courses tabs.
Click in Share something... and type a short message, for example "Registration for Monday's session".
Click Events at the bottom right of the post box.

The Add Events window opens. Fill it in:
Event name – the box at the top.
When – the start date and time, then the end date and time.
Where – paste the Zoom, Teams or Meet link, or enter a physical location.
Notifications – when reminders are sent before the event. Each row is an in-app Notification or an Email, sent a number of Minutes, Hours or Days before. Click the bin icon to remove a reminder.
Enable invitations – leave this ticked to send invitations to the people you add.
Rooms – each row is a room with its own hosts and attendees. Most events need just 1 room.
Hosts and Attendees – type @ followed by the person's name, then select them from the list.
Add (bottom left) – choose Add Notification for another reminder, or Add Room for a breakout room or a second physical room that runs at the same time.
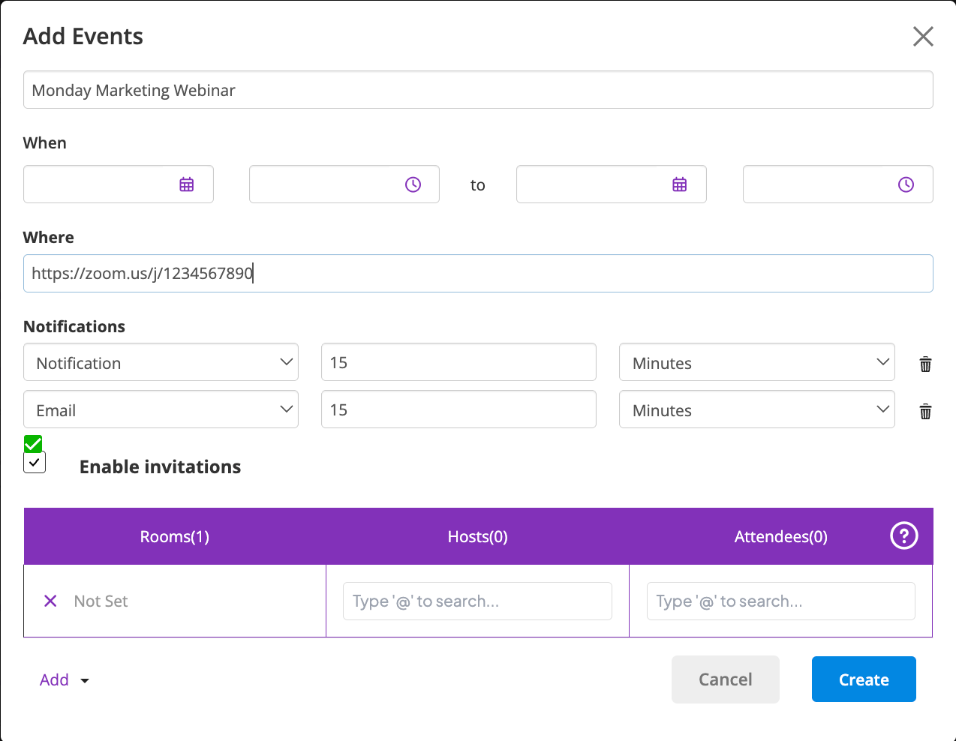
Click Create. The event details appear under your message in the post box.
Click the send arrow to publish the post.

Important: Clicking Create only attaches the event to your draft post. The event is not live until you publish the post with the send arrow.
Mark attendance and download it
Open the Group and click View Event on the event post. The Rooms, Hosts and Attendees table opens.
Once the event has started, tick the circle next to each person who attended.
Click the three dots at the top right of the post and select Download CSV.
Click the ? icon in the table at any time for a reminder of how hosts, attendees and attendance work.
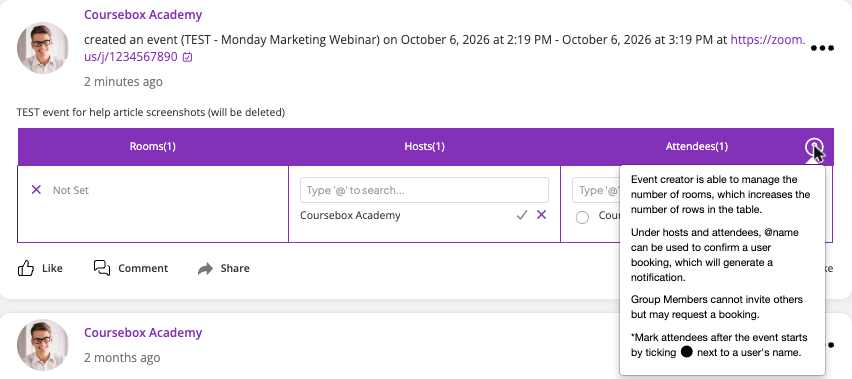
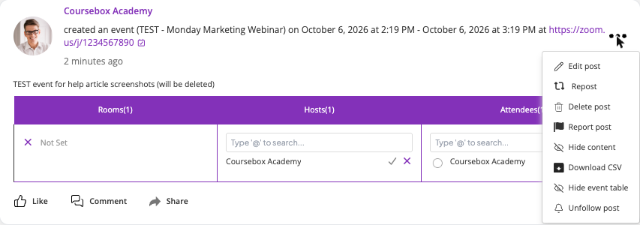
The same menu has Hide event table to collapse the table on the post, plus Edit post and Delete post.
The CSV lists the attendees and their attendance. It does not include custom profile fields (see Custom registration fields below).
Tip: Run a test event with 1 or 2 colleagues before your first real session so you know how marking and the CSV look.
Method 2: Create a Calendar event
The Calendar is the quickest way to schedule a session and invite people. It does not have attendance marking.
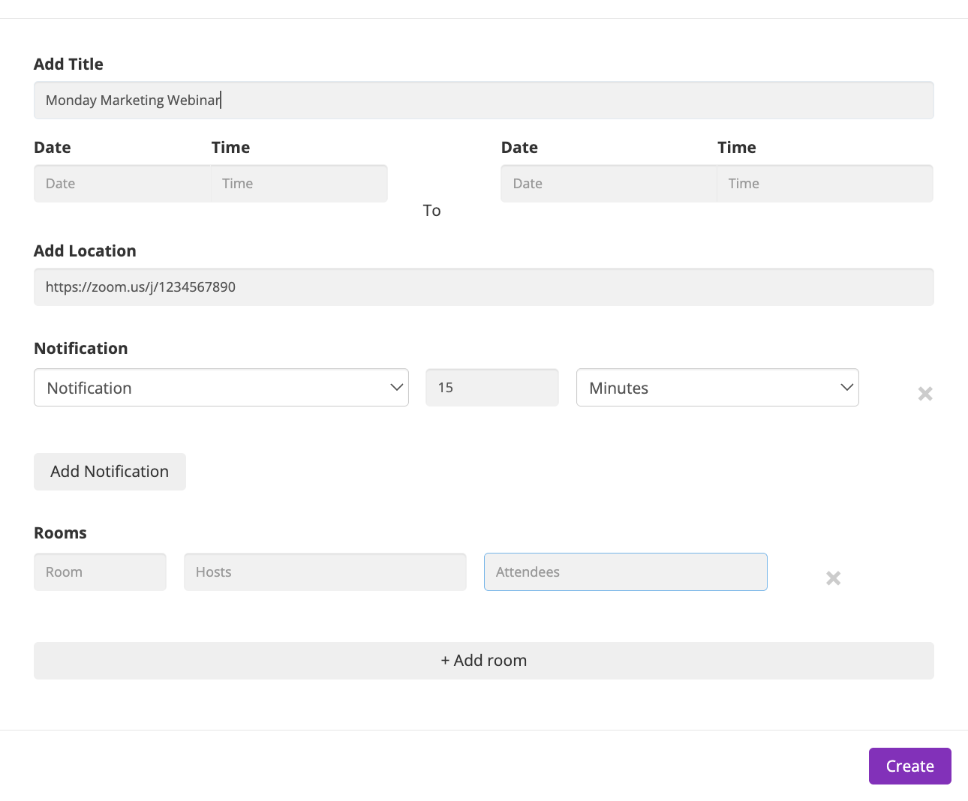
Select Calendar from the left-hand menu and click Add Event, next to All and My Events.
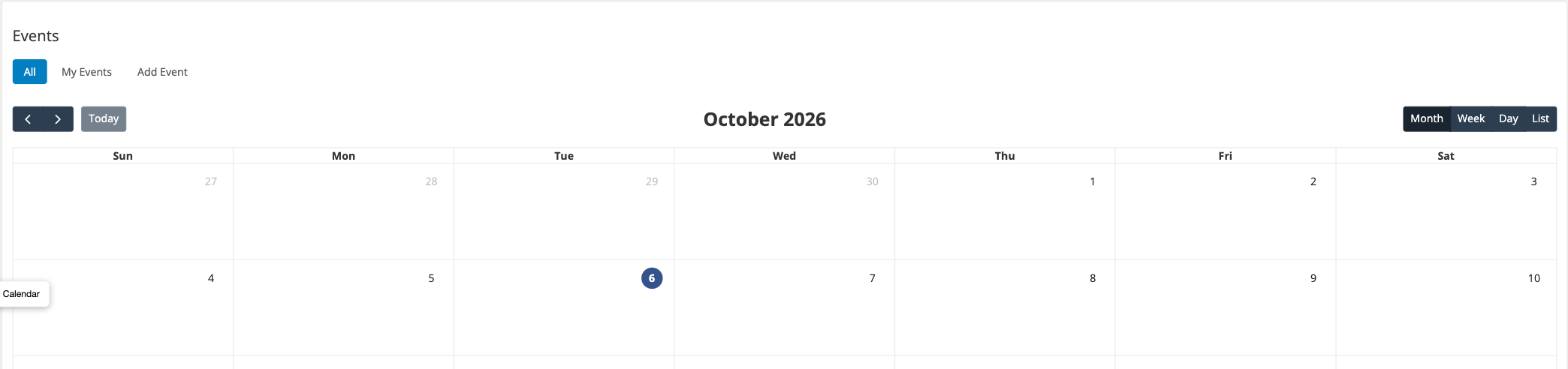
Enter the Add Title, the start Date and Time, the end Date and Time, and Add Location.
Set your reminders under Notification. Click Add Notification for more than one.
Under Rooms, name the room, then search for and select the Hosts and Attendees. Click + Add room for another room.
Click Create.
See Calendar Setup and User Access.
Method 3: Create one course per event
Build a short course that acts as the home page for a session. This suits sessions that have pre-reading, a recording to share afterwards, or where you want attendance to appear in course completion reports.
Suggested course structure
About this session: topic, presenter, date and time, who it is for.
Join the session: the Zoom, Teams or Meet link.
Recording: a text block saying the recording will be added here after the session. Afterwards, add a Video block or paste the recording link.
Confirm your attendance: an assignment where the learner declares they attended.
Keep the Recording page before the attendance page. Learners who missed the session can then still reach the recording without passing the attendance check.
Set up the attendance check
On the attendance page, click Add block and choose Assignment under Assessments.
Turn off Use course content first, then type your own description, for example "I attended this session on 12 October". If you type before turning it off, your text is replaced.
Click Update page.
Hover over the new assignment block and click Edit.
Change the type from Standard with rubric to Simplified open answer.
Turn off AI feedback and set the pass grade to 100.
Save, then Preview the course.
After the session, compare submissions with your Zoom or Teams attendance report and approve each learner who attended. See Add an Assignment and Assignment Grading Options.
Share the course
Specific audience: open the course, click the Enrolments icon, select the Groups tab and click Add group. New members of that Group are enrolled automatically and notified.
Open registration: publish the course as Public and send the link from the Share button. Anyone with the link can register and access it.
Limitations: attendance is self-declared until you approve it, approval is manual for each learner, and the course does not send event reminders. Pair it with a Calendar event (Method 2) if you need reminders.
Custom registration fields
If you need extra details for each attendee, such as school, entity, department or employee number, create custom profile fields. They are stored on the user's profile and apply across the whole portal.
Create a custom field (Super Admin)
Go to Users and open any user's profile.
Click the pencil icon next to their name.
Scroll to the bottom of the form and click Manage custom fields.
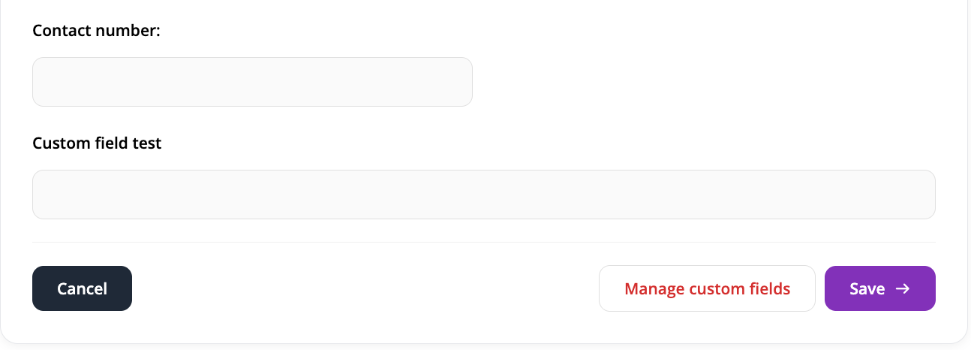
In the Custom Fields window, click the purple + to add a field.
Enter the field name, for example "School name".
Tick User can view and User can edit as needed, then click Save.
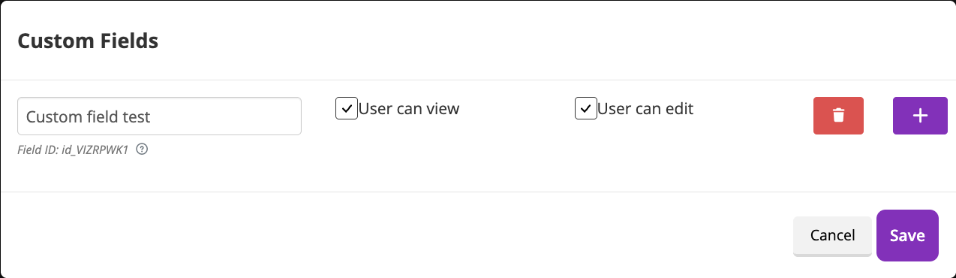
Each field shows a Field ID under its name. Use the red bin icon to delete a field.
Fill in custom fields
Manually: edit each user's profile, or ask users to complete their own profile if you ticked User can edit.
From a registration form: collect the details in Eventbrite, Calendly, Google Forms or Typeform and use the Zapier action Set User Custom Field to write them to the profile (Method 4).
Note: custom fields appear on profile pages. They are not included in the event attendance CSV. If your reporting needs both, match the attendance CSV to your user list by email address.
Method 4: Take registrations in Eventbrite or Calendly and sync with Zapier
Use this when you want a public registration page, paid tickets or custom registration questions, and you want registrants to land in Coursebox automatically.
Connect Zapier
Log in as a Super Admin and go to Settings → Open API. Copy the API Key.
In Zapier, choose Coursebox LMS and enter the API Key and your Coursebox Domain (your portal URL).
Example Zap: Eventbrite registration to Coursebox
Trigger: Eventbrite, New Attendee Registered.
Action: Coursebox LMS, Invite User. Map the attendee's name and email.
Action: Coursebox LMS, Set User Custom Field. Map each custom registration answer (for example School name) to the matching custom field. Add 1 step per field.
Action: Coursebox LMS, Enrol Into Event or Enrol Into Course by Code. In the User field, use the Custom tab and map the User ID or Email from the Invite User step. Do not pick a name from the static list.
The same pattern works with Calendly (trigger: Invitee Created), Google Forms, Typeform or a Google Sheets row.
Useful Coursebox triggers and actions for events
Triggers: New Event, User Enrolled in Event, New User, User Enrolled in Course, Course Completed.
Actions: Invite User, Enrol Into Event, Unenrol From Event, Enrol Into Course by Code, Set User Custom Field, Remove User Custom Field, Update Profile.
For example, use User Enrolled in Event to add a row to a Google Sheet so you keep a running register across all sessions. See How can I use Zapier with Coursebox? for the full list.
Calendly for paid one-on-one sessions
Calendly also connects directly for paid one-on-one bookings. A user adds their hourly rate and Calendly link to their profile, and learners click Book Time. This needs a connected Stripe account. See Booking Time Management.
Method 5: Use Zoom or Teams attendance and keep records in an admin Group
Zoom, Teams and Google Meet already record who joined each session. If you run many sessions, this is usually less work than ticking attendees by hand.
Create a Group for administrators only, for example "Attendance records". Set it to Restricted and add only your admin team, because attendance data is private.
After each session, the host downloads the attendance report from Zoom or Teams.
Post the report in the admin Group using Add to attach the file, with the session name and date in the post text.
Use the report to approve attendance in the event course (Method 3) or to mark the Group event (Method 1).
Automate it with Zapier
Zoom registration to Coursebox: trigger on a new Zoom registrant, then Invite User and Enrol Into Event, so the event's attendee list matches Zoom.
Attendance to a spreadsheet: trigger when a Zoom meeting ends or a participant joins, then add a row to Google Sheets.
Automation needs a paid Zapier account. Everything above can also be done manually.
Share the recording
Copy the recording link from Zoom or Teams and either paste it into a post in the learner Group, or add it to the Recording page of the event course.
Arlo
If you already run your training events in Arlo, a Super Admin can sync an Arlo account with a Coursebox branded portal so that Arlo registrations give access to Coursebox learning. This requires your own Arlo subscription. See Integrations.
Which method should I use?
Internal sessions, known attendees, attendance needed for compliance: Method 1, or Method 3 with Method 5 if you run a high volume.
Just need people to turn up: Method 2.
A different audience for every session: create a Group per audience (for example by subject or role) and enrol the Group into an event course (Method 3).
Optional sessions people opt in to: a Public event course (Method 3) or an external registration page (Method 4).
External or paid registrations with custom questions: Method 4.
Training hours for HR reporting: Method 3 gives a completion record per learner in course reports. Add custom profile fields for the HR details you need.
Current limitations
No recurring events.
No built-in webinar or video meeting tool.
Group and Calendar events are limited to existing portal users.
Calendar events have no attendance marking.
The event attendance CSV does not include custom profile fields.
Recordings are added manually.